
🔩 Delta 16 Scroll Saw Blade Replacement: The Ultimate Technical Guide
Master every aspect of replacing blades on Delta’s iconic 16-inch scroll saw — from identifying the right blade type and part numbers to tensioning techniques, common failure modes, and pro-level maintenance strategies.
The Delta 16-inch scroll saw has been a cornerstone of serious woodworking shops since Delta Machinery first introduced the variable-speed platform in the late 1990s. Whether you’re running the legacy 40-540, the popular 40-694 with its quick-change blade system, or one of the updated 40-695/40-696 variants, one truth is universal: the blade is your most mission-critical consumable, and replacing it correctly determines everything — cut quality, machine longevity, and your safety.
This guide dives deep into the mechanics, compatible blade specifications, the exact clamp hardware involved, common failure modes with part numbers, and expert tensioning protocols that Delta’s own manual only partially covers.
📐 Delta 16″ Scroll Saw — Key Technical Specifications
Before selecting a replacement blade, you need to understand what the machine is physically engineered to accept. These figures apply across the primary 40-6xx product line:
🗂️ Blade Types Compatible With the Delta 16″ Platform
The Delta 16″ scroll saw accepts both pin-end and plain-end (plain-end) blades via its two-clamp upper and lower holder system. Understanding the taxonomy of available blades is crucial to matching blade choice to material and project demands.
| Blade Type | TPI Range | Best Material | Finish Quality | Recommended Size |
|---|---|---|---|---|
| Skip Tooth | 5 – 12 TPI | Softwood, plywood, foam | Medium | #5 – #7 |
| Double Skip Tooth | 5 – 9 TPI | Fast cuts, thick softwood | Rough | #5 – #9 |
| Reverse Skip Tooth | 5 – 12 TPI | Plywood (clean bottom) | Fine | #5 – #7 |
| Modified Geometry (MGT) | 10 – 20 TPI | Hardwood, MDF, veneers | Very Fine | #3 – #5 |
| Crown Tooth | Bi-directional | Acrylic, soft plastics | Polished | #5 |
| Spiral (Omnidirectional) | N/A (twisted) | Fretwork, tight curves | Moderate | #2 – #5 |
| Metal Cutting | 20 – 32 TPI | Thin brass, copper, aluminum | Smooth | #2 – #3 |
For the Delta 40-694’s quick-change chuck system (model-specific part #489504-00), always verify the plain-end blade is seated fully flush against the back face of the clamp before tightening. A misaligned blade under 1,200+ SPM load will snap within seconds — often dangerously. Use a small LED flashlight to inspect the blade seat before powering on.
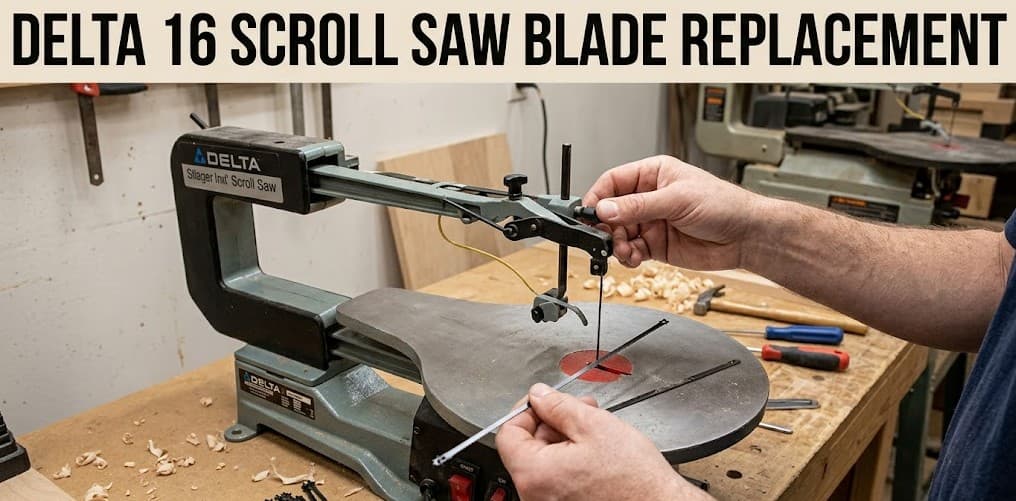
🔧 Step-by-Step Blade Replacement Procedure
Follow these steps precisely whether you’re swapping a broken blade mid-project or doing a scheduled maintenance change. The procedure applies to the 40-694, 40-695, and 40-696 models. For the legacy 40-540, consult the clamp bolt specification note at the end.
🔌 Power Down & Unplug Completely
Switch off at the machine and physically unplug from the wall outlet. On the 40-695/696, also press the dust blower valve to release any residual arm pressure. Never change a blade with the machine plugged in — the return spring mechanism can cause unexpected arm movement.
🎛️ Release Blade Tension Fully
Turn the tension knob (top rear of the upper arm) counterclockwise until it is fully backed off. You should feel the upper arm float upward slightly. On the 40-694, this is a thumb-lever mechanism — flip it to the release position. Tension should read zero before proceeding to clamp removal.
🔩 Loosen the Upper Blade Clamp
Using a 3mm hex key (Allen wrench), loosen — but do not fully remove — the upper blade clamp set screw (part #1330462 on 40-694/695). Two clockwise-viewed quarter turns is typically sufficient to free the blade. If replacing a broken blade, use needle-nose pliers to extract the stub safely.
⬇️ Lower the Blade Through the Table
With the upper clamp loose, slide the blade upward out of the upper holder, then pull it down through the table’s blade slot. On stack-cut or interior fretwork setups, you’ll have threaded the blade through your workpiece — simply reverse that threading direction carefully.
🔩 Loosen the Lower Blade Clamp
The lower blade clamp (part #1330460 on 40-694/695, #5140121-44 on some 40-696 variants) sits in the lower arm, beneath the table. Use the same 3mm hex key to loosen. Remove the blade remnant. Inspect the clamp jaws for brass burring or debris — clean with a fine brass brush if needed.
📐 Insert and Orient the New Blade
Teeth should always point downward and forward (toward the operator). Insert the lower end into the lower clamp first — for plain-end blades, ensure roughly 3mm of blade protrudes beyond the back of the clamp jaw for a secure grip. Snug — do not fully tighten — the lower clamp set screw.
⬆️ Seat the Upper End & Apply Tension
Thread the upper end into the upper clamp. Verify blade is vertical by sighting along it from the front. Snug the upper set screw, then gradually apply tension via the knob — about 3–4 full clockwise turns from zero for a standard #5 blade. Correct tension produces a high, clear ping (like a guitar string) when lightly plucked.
✅ Final Clamp Torque & Test Run
With tension applied, fully tighten both upper and lower clamp set screws to approximately 0.8–1.0 Nm (do not over-torque — stripped set screws are the #1 preventable service issue on the 40-694 series). Run the saw at low speed for 30 seconds on scrap material and re-check tension — new blades can stretch slightly under initial load.
Critical: Blade Orientation Is Non-Negotiable
Installing a blade with teeth pointing upward will cause the workpiece to lift dangerously and the blade to snap under load. Every replacement cycle — even for experienced operators — should include a visual teeth-direction check before powering on.
⚠️ Common Failure Modes, Causes & Part Numbers
Understanding why blades fail — and which machine components contribute — allows you to both extend blade life and identify when worn hardware is the root cause rather than blade quality.
| Failure Mode | Root Cause | Related Part # | Fix |
|---|---|---|---|
| 🔴 Blade snaps near clamp | Over-tension, or clamp jaw burr creating stress riser | #1330460 / #1330462 | Deburr clamp jaws; reduce tension 10–15% |
| 🟠 Blade drifts left/right | Misaligned upper clamp or twisted blade seating | #1330462 (upper clamp) | Re-seat blade; check clamp squareness with table |
| 🟡 Premature tooth dulling | Speed too high for material; no blade lubrication on metal | N/A (operator error) | Reduce SPM; use beeswax lube on non-wood materials |
| 🟠 Blade vibration / chatter | Under-tension or worn arm pivot bearings | #1343005 (arm bearing set) | Increase tension; inspect pivot bearings annually |
| 🔴 Lower clamp set screw strips | Over-torque during tightening; worn hex key rounding socket | #5140121-44 (lower clamp assy) | Replace clamp assembly; use quality ball-end hex keys |
| 🟡 Blade wanders on curves | Wrong blade width for radius; dull blade | N/A (blade selection) | Use narrower blade (#2–#3) for tight curves under 3/8″ |
| 🟠 Upper arm won’t fully tension | Stretched tension spring or worn tension rod | #1345217 (tension spring) | Replace spring; inspect rod threads for elongation |
If you’re breaking blades at the same point repeatedly (always near the upper clamp, always 2–3mm from the jaw), remove the upper clamp assembly entirely and inspect the blade-contact face under a 10x loupe. A single brass burr barely visible to the naked eye is enough to initiate a fatigue fracture within 15 minutes of cutting. File or sand the contact face smooth with 400-grit paper if you see any scratches perpendicular to the blade path.
⚖️ Pin-End vs. Plain-End Blades on the Delta 16″
The single most consequential blade selection decision for Delta 16″ owners is the pin-end versus plain-end debate. Both work on the platform, but they are not equal in practice:
✔️ Plain-End Blades — Advantages
- Vastly wider selection of sizes (#2 through #12)
- Narrower options for tighter internal fretwork curves
- Higher quality metallurgy available (German & Swiss blades)
- Better for thin stock and delicate details
- Required for threading through interior drill holes
- Lower long-term cost per blade in bulk purchases
⚠️ Plain-End Blades — Considerations
- Require proper clamp tightening technique — user error is more consequential
- Can pull out of clamp if set screws are under-torqued
- Interior cuts require re-threading on each new blade
- Clamp hardware can wear over hundreds of change cycles
✔️ Pin-End Blades — Advantages
- Extremely fast swap time — seconds per change
- Zero risk of clamp-related blade pull-out
- Ideal for high-volume production setups
- User-friendly for beginners
⚠️ Pin-End Blades — Considerations
- Limited size range — mostly #5 and above
- Cannot be threaded through small interior holes
- Higher per-blade cost in comparable quality tiers
- Pin hole introduces stress concentration point
Verdict: If your work involves any interior fretwork, delicate detail, or you want access to premium German-made blades (Pegas, Olson, Flying Dutchman), invest the 10 minutes to master plain-end clamping. The quality ceiling is substantially higher.
🛠️ Preventive Maintenance Schedule — Delta 16″ Scroll Saw
Blade replacement is only one part of keeping your Delta scroll saw performing at its best. Consistent preventive maintenance dramatically extends both blade life and the life of the machine itself:
| Interval | Task | Component / Part # | Tools Required |
|---|---|---|---|
| Every Use | Inspect blade for micro-cracks, set-tooth wear, bowing | Blade (consumable) | Eyes / 10x loupe |
| Every Use | Clear sawdust from blade slot and table insert | Table insert #1342527 | Compressed air / brush |
| Monthly | Inspect and clean blade clamp jaws; check for burring | #1330460 / #1330462 | 3mm hex key, fine file |
| Monthly | Lubricate upper & lower arm pivot points | #1343005 (bearings) | Light machine oil |
| Monthly | Check table squareness to blade (0° and 45° angles) | Tilt mechanism / bevel stop | Digital angle gauge |
| Annually | Inspect tension spring for fatigue; measure free length | #1345217 (tension spring) | Calipers |
| Annually | Check motor brush wear (on brushed motor variants) | #489350-00 (brush set) | Screwdriver |
| Annually | Inspect all arm and parallel link hardware for looseness | Various — see service manual | Combination wrench set |
🏆 Top Blade Brands for the Delta 16″ — Expert Recommendations
Not all scroll saw blades are equal, and the market ranges from budget packs that dull after a single session to premium Swiss-made blades that last many multiples longer. Here’s how the top options stack up for Delta 16″ users specifically:
A 12-pack of Pegas #5 Modified Geometry blades retails between $12–$16 USD (approx. $1.00–$1.35/blade). Olson PGT 12-packs run $8–$12 USD. At the budget end, bulk packs of 144 generic blades can be found for $15–$25 USD — but per-session cost can be higher when accounting for faster dulling and greater breakage rates. For serious scroll artists, the Pegas premium pays for itself in cut quality and reduced frustration within the first hour of use.
📚 A Brief Technical History of the Delta 16″ Scroll Saw Platform
Delta Machinery’s scroll saw lineage traces back to the company’s early scroll and jig saw offerings from the 1930s. The modern 16-inch parallel-arm configuration — the architecture used in the 40-540 through 40-696 family — was refined and popularized in the late 1980s and early 1990s as Delta competed with Hegner (the German benchmark) and Excalibur for the prosumer woodworking market.
The parallel-arm design (as opposed to the older C-arm rocker style) was a pivotal engineering decision: by keeping the upper and lower arms parallel throughout the stroke, blade angle to the workpiece remains constant, dramatically improving cut quality and reducing blade flex. The 40-540, introduced with a 1.6-amp motor and variable speed, established the platform’s reputation for reliability at an accessible price point.
Porter-Cable’s acquisition of Delta in 2004 (and subsequent ownership changes through Stanley Black & Decker) affected parts availability and support resources, though the core mechanical platform remained largely unchanged. The 40-694’s “quick-change” blade system — using a lever-actuated upper clamp — was introduced as a user-experience improvement but is notably more prone to clamp-jaw wear than the screw-style clamp on other variants, making understanding replacement hardware part numbers more important for long-term owners.
Today, the Delta 16″ platform occupies a sweet spot: more capable and better-built than entry-level scroll saws from Central Machinery or Craftsman, but more accessible than premium German machines from Hegner or Excalibur. For most serious hobbyists and small production shops, it remains a highly capable and serviceable machine — provided the blade system is properly maintained.
❓ Frequently Asked Questions
🎯 Final Thoughts
The Delta 16″ scroll saw is a highly capable machine whose performance ceiling is defined almost entirely by blade selection, installation technique, and consistent maintenance. The mechanical platform is robust and well-proven — when owners experience frustrating results, the root cause is nearly always a blade-related issue that this guide addresses directly.
Invest in quality blades, master the tensioning sound-test, inspect your clamp hardware quarterly, and you’ll find the Delta 16″ delivers precision fretwork and scroll cutting results that punch well above its price category. The mechanics aren’t complicated — but they do reward attention to detail.