
📏 Measuring Tape Markings Explained: The Ultimate Guide to Reading Every Line
From the smallest ¹⁄₁₆-inch nick to metric centimeter bands — master every tick, fraction, and color code on your measuring tape like a seasoned pro.
Pick up any measuring tape and you are holding a precision instrument that encodes centuries of standardization into a few centimeters of steel or fiberglass ribbon. Yet for most people — even seasoned DIY enthusiasts — the dense forest of tick marks, fractions, color codes, and dual-unit scales can be genuinely bewildering. Misreading a single graduation can cost an entire cut, a board, or a tile row. This guide takes you through every marking system in thorough, practical detail: how the lines are logically structured, what each height hierarchy means, how the metric side differs from imperial, and how to leverage special markings like the black diamond stud finders printed on quality tapes.
The metal hook at the end of your tape slides back and forth by exactly ¹⁄₁₆ inch (the thickness of its own metal tab). This built-in movement ensures accuracy whether you hook over an edge (outside measurement) or press the hook against a surface (inside measurement). This “slop” is a feature, not a defect — it is governed by ANSI/ASME B30.26 manufacturing tolerances.
🔍 The Anatomy of a Measuring Tape — Key Components Explained
Before decoding marks, it pays to understand the physical parts that carry them.
The Hook (Tang)
The L-shaped metal clip at the very tip. On quality tapes (Stanley FatMax, DeWalt DWHT33373), the rivets allow exactly ¹⁄₁₆″ of longitudinal travel for inside/outside accuracy.
The Blade (Ribbon)
Typically spring-hardened steel coated with mylar for print longevity. Premium blades (e.g., Milwaukee 48-22-0325) use nylon-bonded steel for 3× the abrasion resistance.
Imperial Graduations
Printed on one edge (usually top). Numbers represent whole inches; tick marks subdivide each inch into 2, 4, 8, and 16 equal parts — a clean binary-fraction hierarchy.
Metric Graduations
Printed on the opposite edge or reverse face. Centimeter numbers appear every 10 mm; 5 mm marks are mid-height; 1 mm marks are the shortest. No fractions — purely decimal.
Red 16″ Interval Mark
Every 16 inches (standard stud spacing in North American framing), many tapes print the measurement in red or add a ◆ diamond icon. A major time-saver for carpenters and framers.
Black Diamond at 19.2″
Five black diamonds appear at 19.2-inch intervals (every 5th stud when building on 8-foot engineered-lumber panels, or “on center” spacing for truss layout). These are unique to tape measures used in structural work.
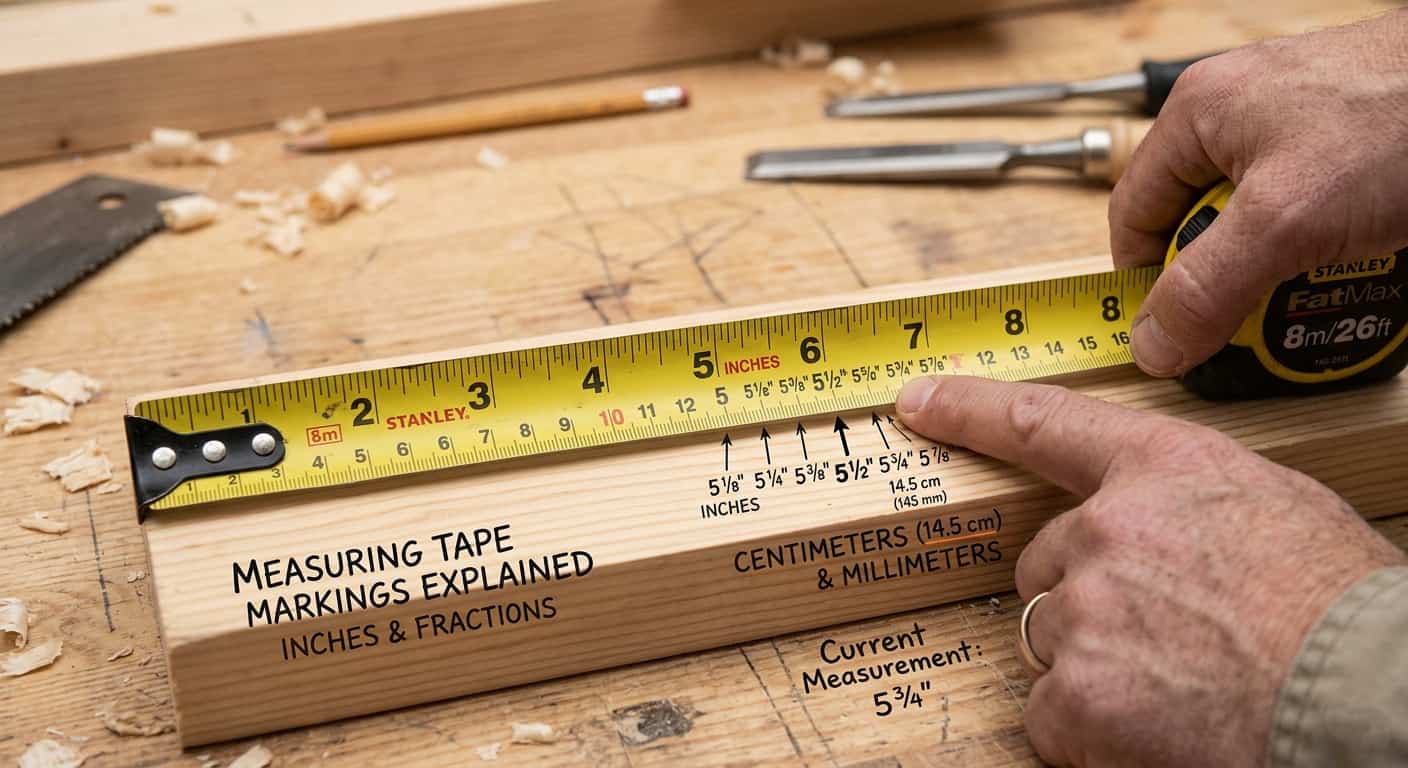
📏 Measuring Tape Markings Labeled — Inch Fractions Visualized
The five-tier hierarchy of tick mark heights encodes a complete binary fraction system. Every height has one specific meaning.
🔢 Every Fraction on an Imperial Tape — At a Glance
All 16 divisions per inch, their decimal equivalents, and the physical height hierarchy of their tick marks.
🧭 How to Read Measuring Tape Markings — Step by Step
Follow this systematic process every time and you will eliminate measurement errors permanently.
Always work left-to-right. The large printed number to the left of your target mark is your whole-inch baseline. If your measurement falls between 7 and 8, you are working in the 7-inch zone. Never estimate — confirm the printed numeral.
Moving right from your whole-inch, the very next tall mark you encounter is the ½-inch mark. If your measurement lands here, you simply add ½ to your baseline (7 + ½ = 7½″). This is the most common secondary measurement point in everyday work.
If your mark falls between the ½-inch and the next whole inch, look at the medium-height marks — these are your ¼ and ¾ marks. Below those, the shorter marks represent eighths (⅛, ⅜, ⅝, ⅞). The tiny shortest marks are always sixteenths.
If precision demands ¹⁄₁₆-inch accuracy, count the tiny ticks from the last named fraction upward. Each tiny tick = 1/16 inch. So if you are at ¾ (= 12/16) and count two more tiny ticks, you are at 14/16 = ⅞. Always simplify the fraction.
On longer tapes, foot markers appear in a different color (often red on a yellow background). A measurement of 6′ 3⅜″ means 6 whole feet + 3 whole inches + 3 eighths of an inch. When using a tape against a baseboard or wall, confirm you are reading the correct foot mark — they can look similar to the 12-inch marks at a glance.
Inside measurements (using the tape pressed against two surfaces) require you to add the blade-case length printed on the body of the tape (typically 2″, 3″, or 63 mm for common tapes). This number is usually printed in bold on the case itself — do not overlook it.
🌍 Metric Measuring Tape Markings — Centimeters & Millimeters Decoded
The metric side is architecturally simpler but equally easy to misread under time pressure.
On a metric blade, the base unit of printed numbers is centimeters (cm), which appear as larger, bolder numerals. Between every two centimeter numbers lie exactly 10 millimeter divisions. The middle mark (5 mm) is typically the second-tallest tick on the metric edge. The remaining 1 mm marks are all equal height and equally spaced, making the metric system visually cleaner but offering fewer visual cues for rapid identification than the imperial binary system.
The most common metric measuring mistake is confusing centimeters for millimeters. A reading of “23” on the blade means 23 cm (230 mm), not 23 mm. In technical drawings and CNC work, dimensions are almost always given in millimeters, so always convert: 23 cm = 230 mm. When in doubt, write the unit alongside every measurement.
| 📊 Metric Mark Type | Physical Height | Unit | Decimal (mm) | Visibility Grade |
|---|---|---|---|---|
| Centimeter numeral | Tallest + printed number | cm | 10.0 mm per step | ⬆ Very High |
| 5 mm mid-mark | Medium (≈60% of cm mark) | 5 mm | 5.0 mm | ▶ High |
| 1 mm divisions | Short (≈35% of cm mark) | mm | 1.0 mm | ▼ Moderate |
| 0.5 mm (specialty tapes only) | Shortest possible | 0.5 mm | 0.5 mm | ▼ Low (needs loupe) |
⚡ Special Markings Explained — Colors, Diamonds & Studs
Beyond the standard fraction grid, premium tapes include several coded markings that transform them from rulers into layout tools.
Red Foot Markers (Every 12″)
Whole-foot marks are often printed in red or have a bold red ring around the number to distinguish them from intermediate inches. Critical on 25ft+ tapes where fatigue causes foot-miscounting errors.
Black Diamonds at 19.2″
Five equally spaced black ◆ symbols mark 19.2-inch intervals (96″ ÷ 5). This is the standard on-center spacing for trusses, joists, and rafter layouts using 8-foot engineered panels — a must for structural carpenters.
Yellow/Red 16″ Stud Marks
Printed every 16 inches in red or highlighted yellow. Standard US residential wall framing uses 16″ O.C. stud spacing, governed by IRC Section R602. These marks let framers skip counting entirely when laying out plates.
Blade Finish — Matte vs Gloss
Matte-finish blades reduce glare in direct sunlight; gloss finishes allow finer print resolution. High-contrast blades (black graduations on bright yellow) remain the most legible across lighting conditions, per ergonomic testing standards.
End-to-End Incremental Numbers
Some specialty tapes print the running total in feet-and-inches alongside pure inch increments on separate lines. These dual-number blades are used in surveying, roofing, and AV/stage rigging where fast reads matter more than fraction precision.
Engineered Lumber Layout (24″ O.C.)
Some carpenter tapes additionally mark 24-inch centers for 24-inch O.C. advanced framing, an energy-efficient wall system using fewer studs. These marks may appear as a distinct color — often blue — on multi-layout professional tapes.
⚖️ Imperial vs Metric Markings — Pros & Cons
Both systems have real-world strengths. Understanding the tradeoffs helps you choose the right scale for every task.
✅ Imperial (Inches & Feet) — Strengths
- 📐 Visual hierarchy of 5 tick heights makes fractions immediately distinguishable without counting
- 🏠 Aligns perfectly with standard lumber dimensions (2×4, 2×6) and drywall panel sizes
- 🔴 Built-in 16″ and 19.2″ stud/joist marks eliminate layout math for residential framing
- 🧱 Foot-and-inch notation is intuitive for room-scale measurements in construction trades
- 💼 Universal in US trades — every contractor, estimator, and inspector uses the same language
⚠️ Imperial — Limitations
- 🔢 Fraction arithmetic (adding ⅝ + ¾) is error-prone under time pressure
- 💻 Incompatible with CAD/engineering drawings which default to decimal metric
- 🌍 Non-standard in most of the world — creates friction in international projects
- 📉 Sixteenth-inch precision is the practical limit; finer work requires vernier calipers
- ❌ Easy to confuse feet with large inch numbers on a glance, especially past 10 feet
✅ Metric (mm & cm) — Strengths
- 🔢 Pure decimal — adding 235 mm + 87 mm is instant, no fraction conversion needed
- 🖥️ Native language of CAD, CNC machining, 3D printing, and engineering
- 🌐 Globally standardized — works seamlessly with international suppliers and clients
- 🎯 1 mm precision is sufficient for nearly all woodworking and construction tasks
- 📋 Simpler mental math when calculating areas and volumes
⚠️ Metric — Limitations
- 👁️ All 1 mm marks are the same height — no visual hierarchy makes rapid identification harder
- 🏗️ No built-in stud spacing marks; framers must calculate or add their own marks
- 🪵 Standard lumber and panel sizes are still sold in imperial in North America
- 🔄 Centimeter/millimeter confusion is surprisingly common among beginners
- 📏 Numbers can run very high (a door height = 2032 mm) making them unwieldy to say or write
A Brief History of Standardized Tape Measure Markings
The folding wooden rule preceded the modern spring-return tape by centuries. Alvin Fellows patented the first spring-return pocket tape measure (US Patent 11,636) in 1868. Early tapes used hand-stamped markings with no standardized height hierarchy — leading to catastrophic measurement errors on large construction projects. The modern 5-tier height system was gradually codified through ANSI/ASME standards and ISO 9001 quality requirements for measuring instruments, eventually making the visual hierarchy we use today globally consistent across reputable manufacturers including Stanley, Milwaukee, DeWalt, Komelon, and Lufkin.
📊 Tape Measure Accuracy Classes & Tolerance Specs
Not all tapes are created equal. International accuracy classes define maximum allowable error per unit length.
| 🏷️ Accuracy Class | Standard | Max Error per 1m | Typical Application | Grade |
|---|---|---|---|---|
| Class I | ISO 3472 / EN 13225 | ±0.3 mm/m | Precision metalwork, surveying, quality control | Professional |
| Class II | ISO 3472 / EN 13225 | ±0.6 mm/m | General carpentry, cabinet making, plumbing | Trade |
| Class III | ISO 3472 | ±1.6 mm/m | DIY, rough construction, landscape | Consumer |
| ANSI / ASME | ASME B89.6.2 | ±1/32″ per 6ft | US trade and engineering standard | Trade |
| Calibrated Survey | NIST traceable | ±0.1 mm/10m | Land surveying, legal boundary marking | Lab/Survey |
Wipe the blade with a dry cloth after outdoor use to prevent rust oxidation at the edges, which degrades print legibility. Never crimp or kink the blade at a sharp angle — this permanently damages the blade geometry and can cause inaccurate retraction. Store the tape in its case away from direct UV exposure, as prolonged sunlight fades the black graduation ink on cheaper mylar-coated blades. Inspect the hook rivets (part reference varies by model — e.g., Stanley 33-425 uses pressed-pin rivets) for looseness every 3–6 months of heavy use. A loose hook causes systematic measurement error and is the #1 cause of field measurement disputes.
🚨 Most Common Measuring Tape Reading Errors — And How to Fix Them
These are the real-world mistakes that waste material, time, and money — and the simple fixes that prevent them.
Parallax Error
Reading the tape at an angle rather than directly perpendicular causes the graduation line to appear offset from its true position. Always position your eye directly above the blade, never from the side. On narrow blades this error can introduce up to ¹⁄₁₆″ of misread.
Ignoring the Hook Float
Forcing the hook fully in or out without allowing it to self-register causes systematic errors. On outside measurements, hook over the edge — the hook slides out by its own thickness. On inside, press firmly — the hook slides in. Never clamp the hook mid-travel.
Tape Sag on Long Pulls
A 25-foot tape extended horizontally without support can sag 2–3 mm at mid-span, making a 12-foot pull read up to ⅛″ short. For long measurements, support the tape at the midpoint, or use a surveyor’s fiberglass tape which has lower elasticity than steel.
Misreading the Inside-Case Offset
When measuring inside a box or cabinet frame, the blade cannot reach the starting wall — you read the number visible at the far wall and must add the case body width (printed on the tape case, typically 2″ or 3″). Forgetting to add this offset is extremely common among beginners.
Confusing ⅝ and ⅞
Under poor lighting or fatigue, the short tick marks for ⅝ and ⅞ look nearly identical. A simple verification: ⅝ is the third short mark after ½, while ⅞ is the last short mark before the next whole inch. If in doubt, count up from the nearest ¼-mark.
Using a Damaged Blade Near the Hook
The first 3–4 inches of a tape blade take the most mechanical abuse. Kinks, dents, or delaminated print in this zone make the most critical (and most frequently used) portion of the tape unreliable. Inspect this zone before any precision work and replace tapes showing blade damage.
❓ Frequently Asked Questions — Measuring Tape Markings
The most searched questions about reading and using measuring tape markings, answered with technical precision.
Master Your Tape — Every Mark Has a Purpose
Every tick on a measuring tape exists for a specific reason — no space is wasted. From the ¹⁄₁₆-inch graduation that defines a precise tenon shoulder, to the black diamond that places a structural truss with a single glance, the measuring tape is a densely encoded precision instrument. Invest 20 minutes practicing the hierarchy system on a quality blade and you will never second-guess a measurement again. The best carpenters, framers, and machinists are not faster because they rush — they are faster because they read accurately the first time.